I love raspberry flavour! But I hate eating cake and getting a mouth full of seeds with every bite. So I actually strain my raspberry jam to get rid of this problem. You don’t have to do this if you don’t have anything against raspberry seeds. Of course there exists seedless raspberry jam. They just don’t have it in my local grocery store. Just like they stopped selling whole wheat flour which annoys me in ways I can’t describe. I guess people in the area where I live don’t like whole wheat flour. However, they do apparently buy other healthy stuff like spelt syrup, chia seeds and what not.
Total time: 5 hours (including cooling). Things will be easier if you bake the cakes the night before assembling the cake.
Equipment: food thermometer, electric mixer, two 18 cm springform pans.
Ingredients
for the cakes
- 6 eggs
- 200 g sugar
- 160 g flour
- 2 teaspoons baking powder
- 40 g cornstarch
- pink and purple food colouring (optional)
for the ganache filling
- 200 g dark chocolate
- 250 g heavy cream (or soy cream)
for the raspberry meringue buttercream topping
- 1 egg white
- 60 g sugar
- 85 g butter
- 3 tablespoons raspberry jam
for the simple syrup
- 100 g sugar
- 100 ml water
for decorations
- a couple of fresh raspberries
- some dark chocolate
Directions
bake the cakes
- Preheat your oven to 160 C. Grease two 18 cm spring form pans and line the bottom with baking paper. If you have only one pan it is best to split the recipe in half and bake the cakes one by one.
- Crack the eggs into a mixing bowl and beat until foamy.
- Add the sugar to the eggs and continue beating on high speeds until it has increased in volume about 3 times and is a light yellow colour. This might take up to 5 minutes. It will be thick but not as stiff as egg whites would be.
- In a separate bowl stir the flour, baking powder and cornstarch together.
- Fold the dry ingredients into the eggs.
- Optional: Divide the batter in half and dye one half pink and the other purple with the food colouring. Fill each baking pan with batter.
- Bake for 30 minutes or until a skewer inserted in the centre comes out clean.
- Let cool completely.
make the ganache
- Chop the chocolate into small pieces and place in a heat proof bowl.
- Heat the cream in a saucepan until almost boiling.
- Pour the hot cream over the chopped chocolate. Let sit for 5 to 10 minutes.
- Stir the mixture until completely combined.
- Let cool until it has reached spreading consistency. This will take 1.5 to 2 hours.
make the raspberry meringue buttercream
- Place the egg whites and sugar in a heat proof mixing bowl.
- Place the bowl over boiling water (make sure it is not touching the water).
- Whisk the egg whites while heating. Heat until the mixture reaches 75 C.
- Now remove the egg whites from the hot water and place into a stand mixer (alternatively you can use a hand mixer). Beat on high speed until the mixture has cooled. This will take 5 to 10 minutes. The egg whites will be very stiff.
- On low speed stir in the butter bit by bit.
- When the butter is incorporated, use a spatula incorporate the raspberry jam.
make the simple syrup
- Place the water and sugar into a sauce pan and bring to a boil. When all the sugar has dissolved your syrup is ready. Let cool.
assemble the cake
- Cut the tops off of both cakes to make them level and cut both cakes in half. If using the food colouring cut off the caramelisation of the sides of the cakes so the colours of the cakes will show.
- Generously brush simple syrup onto all cake layers.
- Now start stacking the cakes. Begin with the bottom layer and spread a layer of ganache on top. Now place on the next layer and spread again with ganache. Repeat until you have stacked on the final layer.
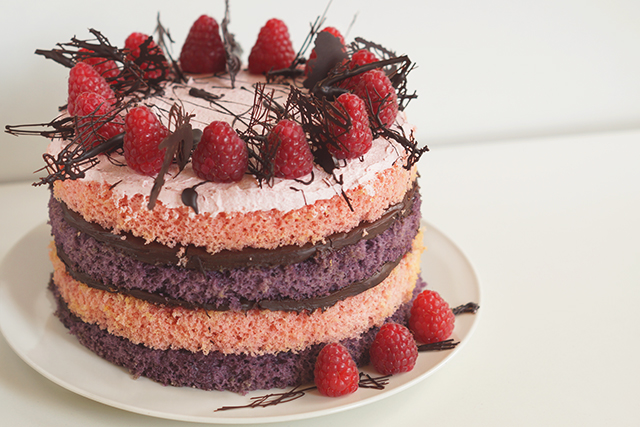
- Spread the raspberry meringue buttercream on top
- Decorate with fresh raspberries and chocolate drizzle.
- Finished!
Note: This cake does not keep very well. Because the sides are not covered they will dry out. It is best to eat it on the same day you assembled it.